How to Make Soft Butter Cake: A Complete Guide to a Perfectly Moist and Tender Classic
A soft butter cake is one of the most beloved and timeless baked goods. With its rich buttery flavor, delicate crumb, and moist texture, it stands as a foundation for countless variations and celebrations. Whether served plain with tea, layered with cream, or topped with fruit, a properly made butter cake delivers comfort and elegance in every slice.
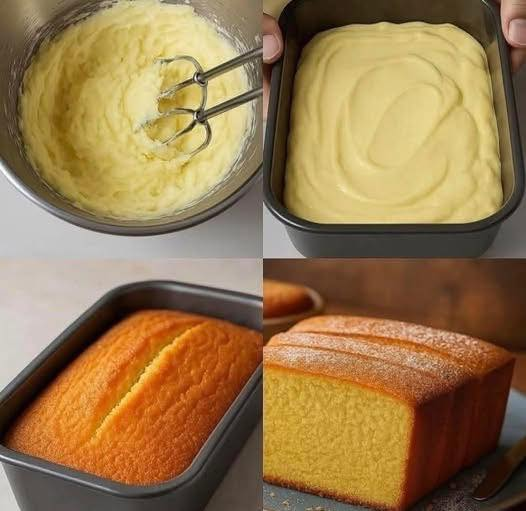
This comprehensive guide walks you through how to make a perfectly soft butter cake step by step. Beyond the recipe itself, you will also learn the baking science behind each stage, common mistakes to avoid, and practical tips that ensure consistent success.
Understanding What Makes a Butter Cake Soft
Butter cake relies on the creaming method, which is different from sponge or chiffon cakes. Instead of depending mainly on whipped eggs for structure, butter cake gets its lift from properly creamed butter and sugar.
When butter and sugar are beaten together, tiny air pockets form. These pockets expand during baking, creating a light texture. Eggs provide structure, flour gives body, milk adds moisture, and baking powder provides gentle additional lift.
The softness of the cake depends on:
Proper creaming of butter and sugar
Using room-temperature ingredients
Correct mixing technique
Not overbaking
Using the right flour
When these elements come together, the result is a cake that is moist, tender, and rich without being heavy.
Ingredients for Soft Butter Cake
Here are the ingredients needed:
1 ¾ cups (230 g) cake flour
½ teaspoon baking powder
1 cup (250 g) butter, at room temperature
1 cup (200 g) castor sugar
5 eggs, at room temperature
1 teaspoon vanilla extract
¼ cup (59 ml) milk, at room temperature
Why These Ingredients Matter
Cake flour is preferred because it has a lower protein content than all-purpose flour. Lower protein means less gluten development, which leads to a softer crumb.
Castor sugar dissolves more easily than regular granulated sugar. This helps create a finer texture.
Room-temperature butter creams better, and room-temperature eggs blend smoothly into the batter without causing curdling.
Milk adds moisture and balances the richness of the butter and eggs.
Step 1: Prepare the Dry Ingredients
Start by sifting the cake flour and baking powder together. For best results, sift the mixture two to three times.
Sifting does more than remove lumps. It aerates the flour, incorporates air, and ensures even distribution of baking powder. This helps produce a lighter cake with a uniform crumb.
If you are using unsalted butter, add about 1 to 1 ¼ teaspoons of salt to the dry ingredients to enhance flavor.
Set the dry mixture aside while preparing the wet ingredients.
Step 2: Cream the Butter and Sugar Properly
Place the room-temperature butter into a mixing bowl. It should be soft enough that you can press it with your finger, but not melted.
Add the castor sugar to the butter.
Begin mixing at low speed for about two minutes to combine. Then increase to medium or medium-high speed and continue beating for approximately 12 to 15 minutes.
This may seem long, but it is one of the most important steps.
The mixture should become pale, light, and fluffy. You will notice a significant change in texture and color. The volume should increase as air is incorporated.
If using a stand mixer, scrape down the sides of the bowl occasionally to ensure even mixing.
Under-creaming leads to a dense cake. Over-creaming to the point where butter melts can also cause structural issues. The goal is a fluffy, airy mixture that holds its shape.
Step 3: Add Eggs One at a Time
Add the eggs one at a time. Beat well after each addition until fully incorporated before adding the next egg.
Adding eggs gradually prevents the batter from curdling and ensures the mixture remains smooth.
If the batter begins to look slightly separated, do not panic. Continue mixing gently and it should come back together.
After all eggs are incorporated, add the vanilla extract and mix briefly to combine.
At this stage, the batter should be smooth, creamy, and light.
Step 4: Incorporate Dry Ingredients and Milk
Now it is time to combine the dry and wet components.
Add the sifted flour mixture gradually, a spoonful at a time. Mix on low speed.
Once about half the flour is incorporated, add half of the milk. Mix gently.
Continue alternating between flour and milk, finishing with flour.
Mix just until everything is combined. Avoid overmixing.
Overmixing at this stage activates gluten in the flour, which can result in a tough or rubbery texture. The batter should be smooth and thick but not overly stiff.
Stop mixing as soon as no dry streaks remain.
Step 5: Prepare the Pan and Oven
Preheat your oven to 320°F (160°C).
A lower baking temperature allows the cake to cook evenly without drying out. High heat can cause the exterior to brown too quickly while the inside remains undercooked.
Prepare a 7×7 inch square pan. Grease it lightly and line it with parchment paper. This ensures easy removal and prevents sticking.
Pour the batter into the prepared pan and smooth the surface gently with a spatula.
Tap the pan lightly on the counter to release any large air bubbles.
Step 6: Bake to Perfection
Place the pan in the preheated oven and bake for 55 to 65 minutes.
Begin checking around the 50-minute mark. Insert a toothpick into the center. If it comes out clean or with a few moist crumbs, the cake is done.
Avoid opening the oven door too frequently during baking, especially in the first 40 minutes. Sudden temperature changes can cause the cake to sink.
Once baked, remove the cake from the oven and allow it to cool in the pan for about 10 minutes.
Then carefully transfer it to a wire rack to cool completely before slicing.
Cooling fully ensures the crumb sets properly and slices cleanly.
Common Mistakes and How to Avoid Them
1. Butter Too Cold or Too Melted
Cold butter does not cream properly. Melted butter cannot trap air. The butter should be soft but still hold its shape.
2. Skipping the Sifting Step
Skipping sifting may lead to uneven texture and clumps. Proper aeration improves lightness.
3. Overmixing After Adding Flour
This develops too much gluten, resulting in a dense cake. Mix only until incorporated.
4. Using Cold Eggs
Cold eggs can cause the batter to curdle and affect texture. Bring eggs to room temperature before starting.
5. Overbaking
Even an extra five minutes can dry out the cake. Start checking early.


")


